mukesh

Mobile

Thursday, 17 May 2012

How to Convert an Old PC into a Modern Server

Your old desktop PC gave you years of reliable service, but eventually it couldn't keep up with modern tasks and applications; so you went out and bought something newer and faster. Now you need to decide what to do with the old clunker.
How to Convert an Old PC into a Storage Server


You could e-recycle it--hand it off to a responsible company that will dismantle it and recycle the parts--but what do you gain from that aside from feeling good about being environmentally responsible? Allow us to suggest another solution: Repurpose the old hulk as a local server. You can use it as a repository for automatic PC backups, or set it up as a file server that you and your employees can access while you're on the road. Those are just two of the roles that an older PC can perform that are of far more benefit to your business than having the machine collect dust or head for the dump.
Best of all, the software--FreeNAS--that will power this machine is exactly what its name describes: a free operating system for network-attached storage. And side from being free, FreeNAS is easy to install, configure, and run. You'll find everything you need to know in this guide.

Installing FreeNAS

Before you begin your FreeNAS installation, obtain a USB thumb drive with a capacity of at least 2GB. You'll install FreeNAS to this drive and boot from it, because you can't run the OS on the same drive that you're using to share files from. Alternatively, you can buy a very small solid-state drive, install FreeNAS on that, and boot the server from it; but investing in such an SSD is an unnecessary expense (unless you're worried that someone might remove the USB drive without realizing the consequences).
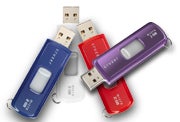
How to Convert an Old PC into a Storage ServerYou'll need a USB key with at least 2GB of storage for this project.
Once you have the necessary thumb drive, download the latest version of FreeNAS from the operating system's official site, taking care to choose the right disc image (that is, .iso file): x86 if your machine is equipped with a 32-bit CPU, or x64 if it has a 64-bit processor. After downloading the .iso file, burn it to a blank CD and drop it into your server-to-be's optical drive.

Now, power up the computer, tap the key that calls up its BIOSboot menu, and choose the option to have the machine boot from its optical drive instead of from its hard drive. If no such menu exists, you'll have to enter the BIOS itself and change the boot order there.
How to Convert an Old PC into a Storage ServerChoose the option to install FreeNAS to a flash drive.
Once all of FreeNAS's FreeBSD-based Linux commands have done their work, you'll see a simple installation screen that gives you four options to choose from. Select the first--the option to install or upgrade FreeNAS 8 to a hard drive or flash drive--and press Enter. Any storage media connected to your system will appear on the next screen. In that next screen, you'll eventually want to select your flash drive as a target for the installation (the OS will create two partitions on the drive: one for the OS itself and one for future FreeNAS upgrades)--but don't press anything yet.

How to Convert an Old PC into a Storage ServerMake sure that you don't need any of the existing data on your flash drive.
Before choosing the installation destination, you need to be aware that FreeNAS will eradicate the data and partitions on the flash drive that you install it on. So this is your last chance to archive any files that your flash drive already contains, before they vanish forever. When you're ready, choose the thumb drive, select Yes, and press Enter. A prompt will appear when the FreeNAS installation process is complete. Press Enter and then select the option to reboot your system in the main menu.

While your system is rebooting, repeat the step where you chose which drive FreeNAS will boot from by default--but this time specify that you want it to boot from the thumb drive plugged into one of the system's USB ports.

Setting Up Your Storage

Once FreeNAS has finished loading, you'll see a console screen that lists all of the networking options you can set for FreeNAS. At this point, your server is up and running.
Assuming that your system works fine at the default settings--and it should, as long as it's connected to your network via ethernet cable--you'll receive an IP address that you can use to access FreeNAS's primary settings. Type this IP address into the Web browser's address bar on any system connected to your network and press Enter.
How to Convert an Old PC into a Storage ServerEstablish admin credentials so that you can manage the server.
The first thing you'll want to do within this Web-based configuration screen is to change your user credentials. Look to the left side and click the My Account menu item to expand it. Now choose an admin user name and a password. Click the button to save your changes. Then click Change Password and do the same. Security first!

To set up your storage volumes, click the Storage button in the upper-left corner of the FreeNAS Web-based configuration screen. From there, click the Create Volume button that appears in the main window. Give your volume a name, select the number of drives you'll want to use to create the volume, and select ZFS as the file system type. You'll find that ZFS delivers a number of benefits that the Unix File System does not. If you're combining multiple drives, you'll have an opportunity at this point to select which RAID type you want to use.
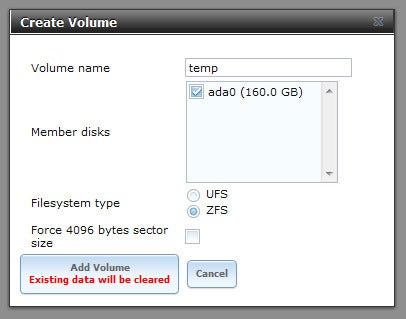
How to Convert an Old PC into a Storage ServerZFS is a superior file system, offering benefits not available in UFS.
Click the Add Volume button when you're ready. If you want your storage to be a shared resource in your office, so that you won't have any individual user account permissions to manage, click theChange Permissions icon and grant write access to both Group and Other users (be sure to select the Set Permissions Recursively option, too). Press the big Change button to cement your configuration.


Setting Up Shares

You've created a basic storage volume on your FreeNAS-powered machine. Now you need to set up your sharing arrangement so that other users can find and access your drive's contents.
CIFS shares are the way to go if your office uses a blend of Mac, Linux, and Windows systems. If you have a Mac-only setup, you might be better served (no pun intended) by configuring the drive for AFP shares. In the spirit of inclusivity, we'll walk through a CIFS setup.
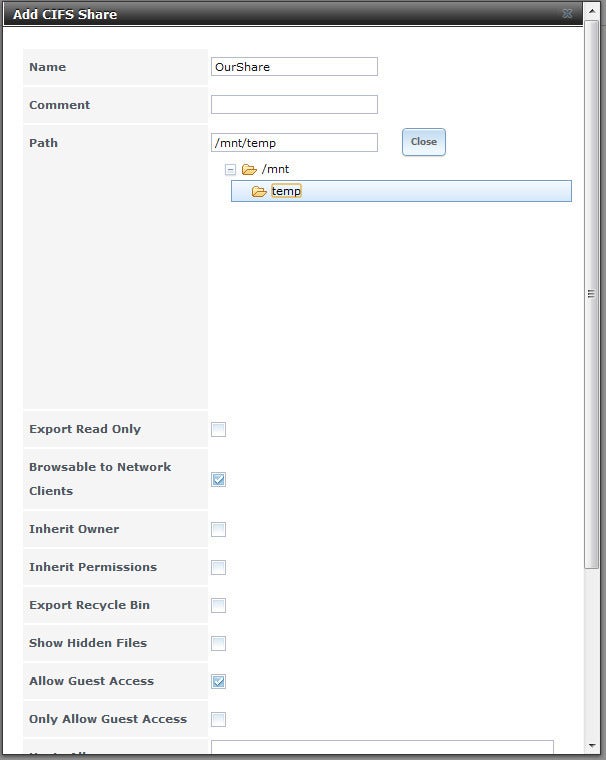
How to Convert an Old PC into a Storage ServerChoose CIFS sharing if your network is PC-only or a mix of Macs and PCs.
Click the Sharing button in the Web configuration screen's left-hand sidebar, and selectAdd CIFS Share. Give your share drive a name and select your volume by clicking theBrowse button on the 'Path' line. Hint: The name you previously assigned to your volume should appear within the /mnt/ folder. Click it and click the Close button. Make sure that the box next to Allow Guest Access is checked, and then click OK.

Finally, click the Services button on the left sidebar and select the Control Services option. Flip the switch on the main panel's CIFS setting to on. VoilĂ ! Type two bakslashes and then the FreeNAS IP address (for example, \\192.168.0.1), into a Windows Explorer window and pressEnter; your shared drive should appear. Use Windows to map this network drive, and you'll never need to hunt it down with an IP address again.
How to Convert an Old PC into a Storage ServerUse Windows to map the share, so you don't need to remember its IP address.
In covering this series of steps, we've glossed over some configuration options that could play a big role in allowing you to see your shared network drive--such as making sure that the CIFS settings (ServicesCIFS) are using the correct workgroup for your network configuration. If you find that this basic setup guide isn't working for you, a network configuration issue is probably holding you back. To resolve the issue, make sure that your FreeNAS network settings basically match those of the other computers on your network.

Our simple share drive is but the tip of the FreeNAS iceberg with regard to features. Options include locking drive access to users and groups, creating recurring snapshots for restoring older copies of files or deleted files entirely, and using the power combination of Dynamic DNS and FTP access to give your offsite workers easy access to the files they need. Now that you've mastered the basics, a world of advanced configurations and scenarios is yours to explore!

Backing Up

How to Convert an Old PC into a Storage ServerWindows 7 Professional and Ultimate allow you to back up and restore your PC over a network.
If you'd like to use your FreeNAS server as a host for automatic client PC backups, you can choose from any number of commercial and freeware applications to run on those clients. If you're running Windows 7 Professional or higher, you can use the built-in Windows Backup and Restore tool (lower versions won't allow you to back up over a network).

Pull up the app within Windows 7 and click the Set Up Backuplink. Select Save on a Network, and use the Browse button to pull up the shared FreeNAS folder you created. If you've already assigned yourself a user account on the FreeNAS server, type in your user name and password; if you haven't, use the default admin user name and password you set up earlier.
How to Convert an Old PC into a Storage ServerChoose which files you want to back up, or let Windows 7 decide for you.
You can let Windows choose the files it thinks are the most important and should be backed up, or you can identify specific files and folders yourself. After that, you should be done with picking options. Your backup will start its first run. When it has finished, click the Change Settings link, and create an automated backup schedule.


Copy a File Path, Show or Hide Extensions

You know those times when you want to upload a new photo to, say, Facebook or Pinterest? The typical browser-based upload tool forces you to click through countless folders until you find the one you want. It's a slow and often maddening dance.

Fortunately, there's an easier way.
If you already have the photo open in Explorer, you can copy its file path to the clipboard, then paste that path into the upload dialog box. Here's how:
  1. Open Windows Explorer and find the photo (or document) in question.
  2. Hold down the Shift key, then right-click the photo.
  3. In the context menu that appears, find and click Copy as path. This copies the file location to the clipboard. (FYI, if you don't hold down Shift when you right-click, the Copy as path option won't appear.)
  4. Now, in your browser, head to Facebook or wherever, access the upload tool, and click Browse.
  5. Press Ctrl-V to paste in the file location, then click OK.

  6. That's all there is to it! No hunting through a bunch of folders to find the file you want--just paste the path and you're done.
    I must give credit where credit is due; I first heard about this clever tip from Windows guru Ed Bott. But it's too great not to share; once you start using it, you'll wonder how you got along without it.

    How to Show or Hide File Extensions

    Recently I've been downloading some audiobooks in MP3 format. I wanted to import them into iTunes for listening on the go, but there's one problem: iTunes (and, more importantly, my iPhone) can't bookmark an MP3 file. Thus, in between listening sessions, it'll be difficult for me to resume my book from where I left off.
    iTunes can, however, bookmark its own audiobook files. So if I convert my MP3s to Apple's AAC format, then change the file extension so iTunes thinks they're audiobooks, I'm good to go.
    The first part is easy. In iTunes, just right-click the MP3 and choose Create AAC Version. That will eventually produce an audio file with an m4a extension. But I need to change that to m4b, the extension iTunes recognizes as an audiobook.
    I had no problem finding the file in Windows Explorer--but the file extension was missing! Or, more accurately, hidden. That's the default setting in Windows nowadays, the idea being to keep you from monkeying with files and causing system problems.
    This kind of monkeying, however, is harmless. I just needed to un-hide the extensions. Here's how:
    1. In Windows 7 (and, I think, Vista), click Start, then type extension.
    2. Click Show or hide file extensions.
    3. In the Folder Options box that appears, clear the check box next to Hide extensions for known file types, then click OK.
    That's it! Now you should see extensions for most common files. And in my case, changing that audio file's extension was as easy as right-clicking it and choosing Rename.
    If you want to hide the extensions again after you're done, just repeat the process and re-check the box mentioned in Step 3.

Improve Your Windows 7 Registry With 7 Easy Tweaks

The Windows Registry is a powerful but confusing component of the Windows operating system. In earlier editions of Windows, editing the Registry was fraught with peril; if the user edited it with the wrong tool or altered a critical key, the result could be an inoperable Windows installation. Windows 7, however, is far more forgiving than its predecessors when it comes to modifying the Registry, if you use the built-in Windows 7 Registry Editor (Regedit).

Getting Started

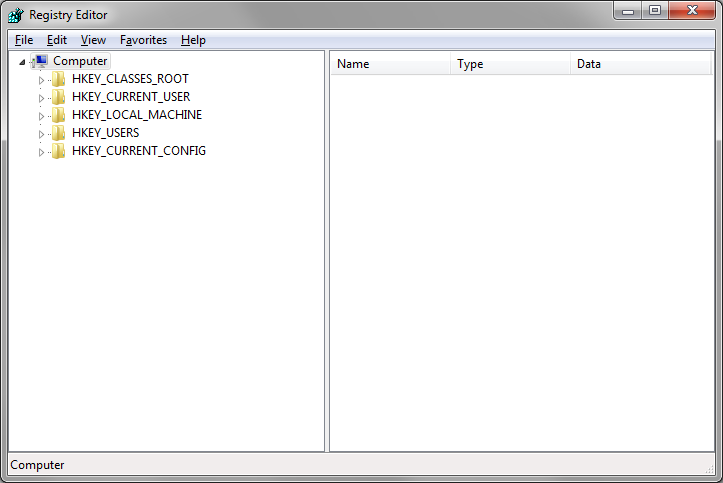
Tweak Your Windows 7 RegistryThere are five main registry keys, or hives, visible on Windows 7 systems when using the OS's built-in registry editor.
To perform any of the Registry modifications outlined in this article, you must first access Windows 7's built-in Registry Editor. To do so, click the Start button, type regedit in the search field, and press Enter. The Windows Registry Editor will open and present you with what looks like a never-ending tree of expandable menu items.
Five main keys (also called hives) are visible in the Windows 7 Registry (a sixth key, which holds performance data, remains hidden when you use the Registry Editor):
HKEY_CLASSES_ROOT (HKCR) stores settings for all applications, utilities, and programs installed on a system.
HKEY_CURRENT_USER (HKCU) stores settings for the user who is logged in.
HKEY_USERS (HKU) stores settings for all of the user accounts on a given system.
HKEY_LOCAL_MACHINE (HKLM) stores settings specific to the system that Windows is installed on.
HKEY_CURRENT_CONFIG (HKCC) stores settings gathered or determined at runtime, generally when the system boots up.
The name of each main key indicates fairly clearly the settings it governs. If you want to tweak a specific piece of hardware in your system, the setting is probably saved in HKLM; settings for your user account usually appear in HKU or HKCU.
Before you make any changes to the Registry, update your backup files. The Registry Editor makes backing up specific keys, or even the entire Registry, very easy. To back up the whole Windows Registry, highlight Computer in the left pane of the Regedit window, go to the File menu, and click Export. Name your backup file in the resulting window and click Save, and the entire Registry will be saved in one massive file. Keep this file handy on a separate hard drive; if something goes wrong, you can always re-import it to restore your old Registry settings.
You probably won't need a backup of the entire Registry, however. Over the course of this article, we'll be altering only a few keys, so you can limit yourself to creating backups for just those keys. Backing up specific keys follows the same process as backing up the entire Registry, except that instead of highlighting 'Computer' in the left pane of the Regedit window, you select the key that you plan to alter, and export it to a safe place. To restore the backed-up Registry key, double-click the file--it will automatically update your Registry with the old key.

Edit Your Context Menus

Windows 7 Registry TweaksRemoving extraneous options from context menus is a simple matter of deleting a few keys from the Registry.
Over time, as you install more and more applications and utilities on your Windows system, some right-click context menus (the little menus that pop up when you right-click icons or your desktop) may become cluttered with options. In contrast, most right-click context menus on a clean system list only a few options. If your context menus have become cluttered, it's time to clean house.
Typically, the options listed in your context menus are stored in these five Registry keys:
HKEY_CLASSES_ROOT\*\shell
HKEY_CLASSES_ROOT\*\shellex\ContextMenuHandlers
HKEY_CLASSES_ROOT\AllFileSystemObjects\ShellEx
HKEY_CLASSES_ROOT\Directory\shell
HKEY_CLASSES_ROOT\Directory\shellex\ContextMenuHandlers
If you'd like to remove a context menu option, look for its listing in one if these keys. To remove it, highlight the specific key, right-click it, and choose Delete from the menu. Be sure to highlight only the specific key for the context menu item you want to remove, and not the main ContextMenuHandlers, Shell, or ShellEx keys; otherwise, you'll delete the entire menu.

Add 'Open Command Prompt Here' Option for Any Folder

Though they have fewer and fewer reasons to do so, some users (including me) like to perform tasks from a command line. Unfortunately, navigating the myriad folders on a Windows 7 system from a command prompt can be a pain, especially if many of them have long file names.
But it's easy to arrange for Windows 7 to open a command prompt window automatically in the directory being viewed. To do this, open the Registry Editor and navigate to theHKCR\Directory\Background\shell key. Highlight shell; right-click it; and choose NewKey from the menu. Name the new key Open Command Prompt Here. Once you've created the new key, highlight it and again choose NewKey from the menu. Create another key named command. Highlight the newly created command entry, and you'll see in the right Regedit pane that a default string value has been automatically created. In the right pane, highlight (Default), right-click it, and choose Modify from the menu. In the Edit String window that opens, type cmd.exe, click OK, and close the Registry Editor. When you're done, right-click the background of your desktop (or any folder in Windows Explorer) and choose Open Command Prompt Here to open a command prompt with a command line pointing to that directory.

Add a Defrag Option When Right-Clicking Hard Drives

For most Windows users, defragging a hard drive entails opening the Computer menu or the Libraries menu, right-clicking the drive, selecting Properties from the menu, clicking the Tools tab at the top of Properties window, and finally clicking the Defragment Now button. Here's how to arrange to launch the Windows Disk Defragmenter simply by right-clicking your hard drive.
Open the Registry Editor and navigate to the HKCR\Drive\shell key. Highlight shell; right-click it; and choose NewKey from the menu. Name the new key runas. After you create it, a default string value should be automatically appear in the right Regedit pane. Highlight the runas key in the left pane, right-click (Default) in the right pane, and choose Modify from the menu. In the subsequent Edit String window that opens, enter Defragment and click OK.
Next, highlight the newly created runas key again, right-click, and choose NewKey from the menu once more. Create another key named command. Highlight command and, in the right pane, highlight the (Default) value that was automatically created; then right-click it, and chooseModify from the menu. In the Edit String window that opens, type dfrgui.exe, click OK and close Regedit. Now, when you right-click a drive in the Computer window or the Libraries window, the Defragment option should be available.

Pin Applications to Your Background Context Menu

Windows 7 Registry TweaksYou can set up quick access to your favorite applications by making some simple tweaks to the Windows Registry.
Windows 7 affords users multiple areas to pin shortcuts for their favorite applications. But what if you have an application or utility that doesn't warrant a prime piece of real estate in your Taskbar or Start Menu? Well, you can neatly tuck those apps away in your right-click context menu for quick access.
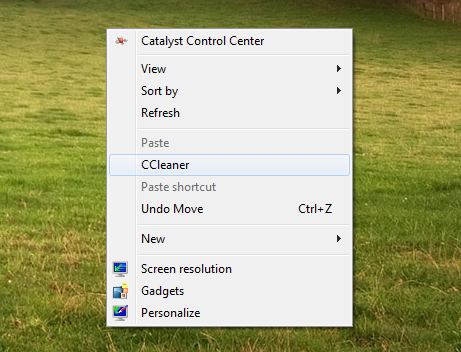
To pin an application to a context menu, open the Registry Editor and navigate to theHKCR\Directory\Background\shell key. Highlight shell, right-click it, and choose NewKey from the menu. Name the key whatever you like; we chose CCleaner, since we decided to add a shortcut to that handy cleaning utility to our menu. Once you've created your new key, highlight it, and again choose NewKey from the menu. Create another new key named command.
Next, highlight command and once again you'll see that an automatically created default string value now appears in the right Regedit pane. In the right pane, highlight (Default), right-click it, and choose Modify from the menu. In the Edit String window that opens, enter the path to the executable for the application that you'd like to run; in our case we entered "C:\Program Files (x86)\CCleaner\CCleaner.exe" (including the quotes). Click OK, and then close Regedit. Henceforth, anytime you right-click your desktop or the background of a folder, you can launch the application with a single click.

Disable Notification Balloons

Few things are more annoying to experienced users than the balloon tips that pop up in the notification area on a freshly installed copy of Windows. Thankfully, they are easy to disable with a quick Registry hack.
By default, when you run a disk cleanup on a Windows 7 system, the operation will limit itself to deleting temporary files that are at least seven days old. Since there are few reasons to keep temp files for that long, however, let's look at how to arrange to delete any temp file that's at least one day old.
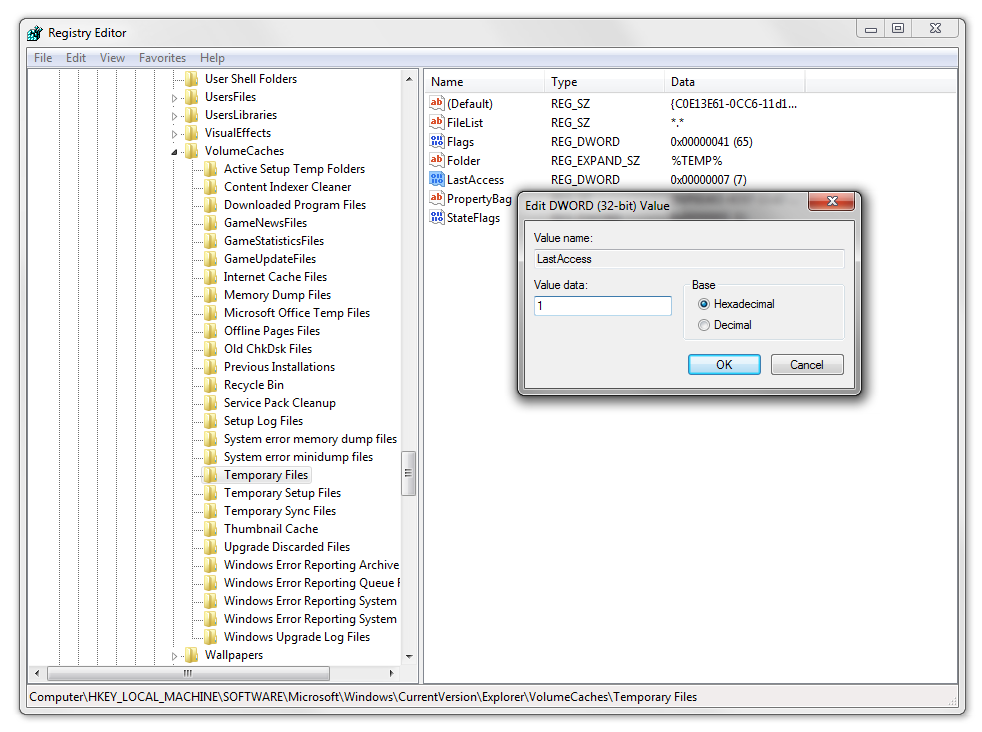
Open the Registry Editor and navigate to theHKLM\SOFTWARE\Microsoft\Windows\CurrentVersion\Explorer\VolumeCaches\Temporary Files key. Click the Temporary Files key to highlight it, and in the right Regedit pane you'll see a DWORD value named LastAccess that has a value of 7 associated with it. Highlight LastAccess, right-click it, and choose Modify from the menu. In the edit window that opens, change the Value data to 1, and click OK. Exit Regedit, and you're done. After you've made that change, a disk cleanup will delete any temporary file that is more than one day old.

Have Disk Cleanup Delete (Virtually) All Files

Windows 7 Registry TweaksBy default, Disk Cleanup deletes only files that are at least seven days old. With a quick Registry mod, you can reduce the holding period to one day.

Open the Registry Editor and navigate to  theHKLM\SOFTWARE\Microsoft\Windows\CurrentVersion\Explorer\VolumeCaches\Temporary Files key. Click the Temporary Files key to highlight it, and in the right Regedit pane you'll see a DWORD value named LastAccess that has a value of 7 associated with it. Highlight LastAccess, right-click it, and choose Modify from the menu. In the edit window that opens, change the Value data to 1, and click OK. Exit Regedit, and you're done. After you've made that change, a disk cleanup will delete any temporary file that is more than one day old.By default, when you run a disk cleanup on a Windows 7 system, the operation will limit itself to deleting temporary files that are at least seven days old. Since there are few reasons to keep temp files for that long, however, let's look at how to arrange to delete any temp file that's at least one day old.

Add 'Take Ownership' to Right-Click Context Menu

Sooner or later you'll probably come across a file that you can't access for some reason, despite being logged in as an Administrator. In situations like this, taking ownership of the file or directory can help you gain access to the file, but the process is somewhat tedious. With some Registry editing, however, taking ownership of a file or directory is just a right-click away.
Instead of walking you through this process, though, we'll explain how to complete it in one fell swoop. First, select and copy all of the text listed below:
Windows Registry Editor Version 5.00
[HKEY_CLASSES_ROOT\*\shell\runas]
@="Take Ownership"
"NoWorkingDirectory"=""
[HKEY_CLASSES_ROOT\*\shell\runas\command]
@="cmd.exe /c takeown /f \"%1\" && icacls \"%1\" /grant administrators:F"
"IsolatedCommand"="cmd.exe /c takeown /f \"%1\" && icacls \"%1\" /grant administrators:F"
[HKEY_CLASSES_ROOT\Directory\shell\runas]
@="Take Ownership"
"NoWorkingDirectory"=""
[HKEY_CLASSES_ROOT\Directory\shell\runas\command]
@="cmd.exe /c takeown /f \"%1\" /r /d y && icacls \"%1\" /grant administrators:F /t"
"IsolatedCommand"="cmd.exe /c takeown /f \"%1\" /r /d y && icacls \"%1\" /grant administrators:F /t"
Once you've copied all of that text, paste it into a new Notepad (or any basic text editor) document, and save the file with a *.reg extension; name it take-ownership.reg, for example. After saving the file, double-click it, follow the on-screen prompts, and add all of the keys to the Registry. Now you can right-click a file or folder and choose Take Ownership from the menu if you can't access or edit for some reason.
Congratulations, you're now a Windows 7 power user! If you find these Registry hacks useful, check out "9 Easy and Powerful Windows 7 Registry Tweaks" for more ways to customize the way your Windows 7 PC operates.

How to Create a Bootable Mac OS X Flash Drive


A bootable Mac OS X thumb drive comes in handy when you need to troubleshoot OS issues for yourself, your family, or your friends. It's also extremely useful for keeping your basic setup consistent across multiple computers, if you find yourself switching hardware regularly; and I've had fun in the past setting up a bootable USB keychain loaded with all the apps and files I need to turn any Mac-compatible computer into a viable media center quickly and easily.
With Mac OS X Lion and a new piece of free software, it's easier than ever to create a USB keychain that you can boot from. All you need is a few minutes, a copy of Lion, and a USB flash drive with at least 4GB of storage (though more is preferable).

Preparation

The first step in getting Lion onto your USB drive is to obtain a copy of the OS itself. Unfortunately, the file you download from the Mac App Store to your computer deletes itself after you update to Lion, so you'll probably need to redownload the OS update.
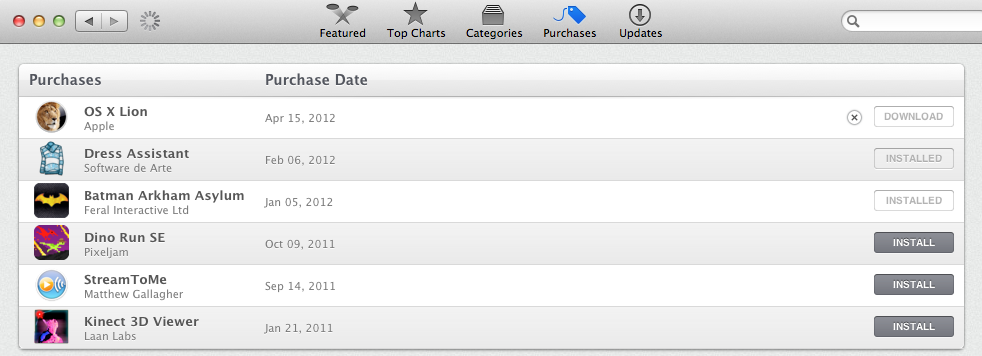
This is a simple but slightly time-consuming process. Go into the App Store application and open the Purchases tab at the top of the screen. From there, you should see OS X Lion as one of your previous purchases. Click the Download button next to Lion, note the directory that it downloads to and wait for the download to finish. During testing it took me about 50 minutes to redownload the 4GB or so of content that comprises Lion. Once the OS has finished downloading (and you've verified that Lion has landed safely in your Applications folder), you're ready to transfer it to your trusty USB flash drive.
Create a Bootable Mac OS X Flash DriveIf you already own a copy of OS X Lion, you should be able to download a fresh copy at any time from the Purchases tab of the Mac App Store.
To streamline the process, download the free Lion DiscMaker app. Downloading a third-party app just to handle this process is a bit of a bother, but Lion Discmaker enormously simplifies the process of installing Lion on a USB keychain.
Now, before you start formatting your drive, back up anything currently on your flash drive that you'd like to keep--because this process will completely erase the contents of the USB drive and rewrite it with a copy of Lion. You have been warned!

Creating Your Bootable Drive

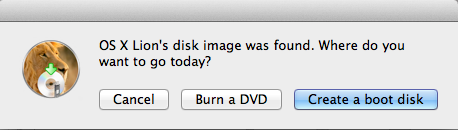
Lion DiscMaker makes this part of the process a snap. Start the Lion DiscMaker app with your USB flash drive plugged in and with the Lion install file sitting inside your application folder. The app will give you the option of creating a bootable drive out of either a DVD or a USB keychain. Select the USB keychain option. (If you happen to own a Mac with a disc drive, consider creating a DVD backup of Lion. I prefer keeping Lion on a USB keychain so that I can add files to the USB drive to customize the installation; but if you're just looking for a bootable copy to troubleshoot your hardware, feel free to go with the DVD option and save yourself a little cash.)
Create a Bootable Mac OS X Flash DriveLion DiscMaker makes it easy to create a bootable thumb drive.
Once you've indicated that you want use a bootable drive, the app will ask whether you'd like to use a USB thumb drive or some other kind of disk. Select the USB thumb drive option again; and when prompted, choose the disk that you'd like to install Lion to. Select your flash drive and you should be ready to rock.
If you're using a thumb drive that has only 4GB of free space, Lion DiscMaker will remind you that you won't get a complete of OS X Lion package because there won't be room for the "additional speech voices" package. This should be no great loss. Select Okay and then, to confirm that you're aware the volume will be erased, click the Erase then create the disk button.
The copy procedure will take a few minutes and will open a few windows in your finder automatically, but Lion Discmaker should automate the whole process. All you have to do is wait for your Mac to cease displaying its "Copy in progress, please wait..." message, which will indicate that DiscMaker has finished installing Lion onto your flash drive. Once that's done, you'll have a bootable USB flash drive that fits in your pocket and can handle system recovery, OS installation, and even basic Web browsing in a pinch.
If you have any space left over on your flash drive, you can add a few of your favorite applications and files, to customize a new installation. Regrettably, these files won't be accessible when you boot directly from the USB flash drive; but once the installation is finished, they can help you save considerable time while setting up a new computer.
Of course the bootable drive that this method creates is no substitute for a fully customized Mac OS X Lion-based computer, but considering how fast and easy the drive is to set up--and how much time it could save you the next time you need to reinstall or troubleshoot your Mac OS X--there's no good reason not to make your own bootable copy of Lion to carry in your pocket. Good luck!

How to Migrate from Windows XP to 7, and from Server 2003 to 2008 R2

When it comes to adopting new operating systems and applications, common practice among system administrators is to delay adoption until the release of the first service pack. Admins found plenty of reasons to put off moving from Windows XP to Windows Vista, and then to Windows 7: The new operating systems demanded more capable hardware, the user interface changes required user training, and there were compatibility issues with legacy hardware and applications.

These days, it’s becoming difficult to find device drivers and applications compatible with Windows XP. More importantly, Microsoft has ended mainstream support for Windows XP, and extended support ends in 2014. New PCs come with Windows 7 by default, so admins must support both operating systems anyway. And with Microsoft widely expected to ship Windows 8 in October, can your business afford to be two or three OS generations behind? Unless you intend to set aside the first-service-pack rule, it’s time to bite the bullet and move forward.
Server admins are even more conservative. In this case, Windows Server 2008 R2 requires 64-bit hardware, and the interface is just different enough to make them nervous. The latest server applications, however, are compatible only with the newer operating system. Microsoft ended mainstream support for Windows 2003 in 2010, and extended support ends in 2015.
Here are the top six decisions you’ll need to make before embarking on a migration:
1. Should you install the 32-bit version or the 64-bit version?
At the desktop level, there are few advantages to installing the 64-bit version of Windows 7. The biggest reason to stick with the 32-bit version is that you might have difficulty finding 64-bit drivers for legacy hardware. And some applications don’t function well in a 64-bit environment. Unless you’re positive you won’t need to support legacy hardware, or if you have specific needs that can be filled only by a 64-bit OS (addressing more than 3GB of RAM, for instance), you should set up most desktops with the 32-bit OS.
There is no 32-bit version of Windows 2008 R2. You can run 32-bit applications, but 32-bit support is not installed by default
2. Can you find compatible device drivers?
As we’ve already mentioned, you might have difficulty finding Windows 7 drivers for legacy hardware, ranging from old printers and scanners to specialized tools such as point–of-sale devices that rely on legacy serial ports. In fact, any new PCs you acquire probably won’t even be outfitted with parallel or serial ports. Make a list of these devices and decide whether you’ll replace them or retain some Windows XP computers to continue running them.

3. Which applications will need upgrades?
You can run Office 2003 on Windows 7, but no one would recommend running Office 2010 on Windows XP. Make a list of the applications that will need to be updated and remember that users will need training on both the new operating system and the new applications.
On the server side, Exchange 2003 or 2007 will run on Windows Server 2003, but Exchange 2010 requires Windows 2008.The same is true for the latest versions of SharePoint, SQL Server, and most other server applications. To reduce the impact on the enterprise, you might want to install new servers along with the new server applications, and then migrate users and their data from the old server to the new.
4. Should you upgrade in place, or start fresh?
When upgrading desktop systems, you have two choices: Install the new OS in an existing system, or start fresh with new hardware. Windows 7’s system requirements are beyond the capabilities of most PCs that came with Windows XP installed, so you might need to beef up the hardware to upgrade in place. The same is true of servers put in service when Windows Server 2003 was new.
Upgrading in place enables you to transfer user settings, application settings, and more from the old hardware to the new using the Windows migration tool or aftermarket tools. Most applications will have to be reinstalled, and you’ll want to run Microsoft’s Windows 7 compatibility tester to determine if any of the old applications will have problems running on the new OS.
5. Is virtual desktop infrastructure a viable alternative?
You can avoid acquiring new desktop hardware by deploying virtual desktop infrastructure (VDI). Set up a server application that runs virtual iterations of both Windows 7 and Windows XP desktops, and your users will use their existing Windows XP machines to access these environments. This will help them transition to Windows 7 while ensuring continued access to their familiar Windows XP desktops and legacy applications. VDI will require server and networking infrastructure that will likely offset the savings realized by retaining your old desktop hardware. In the long run, however, VDI will simplify desktop management, and your users will experience an easier transition.

6. Should you invest in migration tools?
Migration tools can ease the pain of a mass upgrade by transferring operating system settings, application settings, and even some applications and drivers from old systems to new ones. Users can spend dozens of hours setting up their applications just the way they like, updating dictionaries in word processors; recreating macros, templates, and forms; and so on. The cost of such tools could be offset by avoiding such productivity loss.

: Search Gets Smarter and More DirectGoogle Knowledge Graph


Move over, 10 blue links. Google Knowledge Graph is the search giant's latest attempt to provide direct answers in its results instead of just sending people elsewhere.
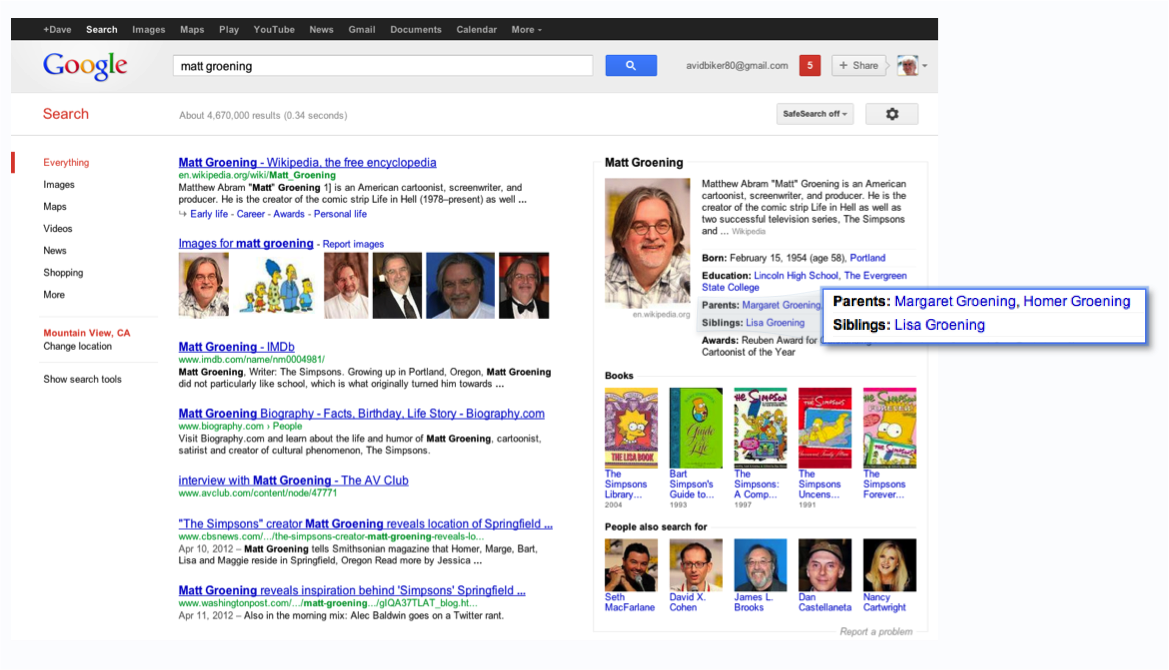
The new feature, which is gradually rolling out to all users, adds boxes full of Wikipedia-like information to the search results page, covering subjects such as landmarks, celebrities, cities, media, and sports teams. The graph draws on public sources including Freebase, the CIA World Factbook, and, of course, Wikipedia. Some users started seeing these fact boxes last week, but now they're official.
Google says it's not just providing factoids with Knowledge Graph. It's also drawing upon the relationship between objects to try and figure out what people want to know. For instance, the fact box for Marie Curie shows what elements she discovered, and the one for Charles Dickens shows what books he wrote, and many of these facts link to new searches on related topics. According to Google, the information that Knowledge Graph shows about Tom Cruise answers 37 percent of the next questions people ask about him.
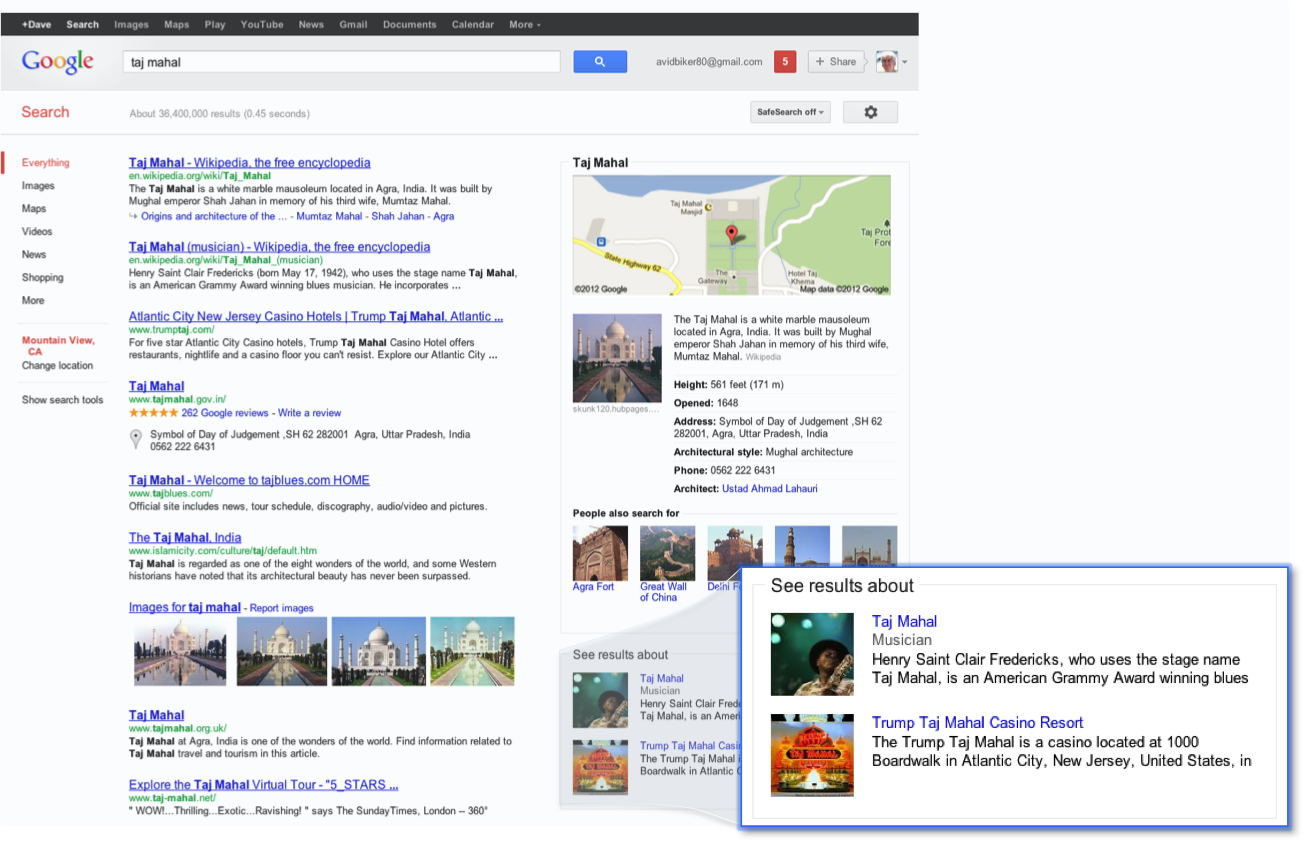
Google Knowledge Graph will also try to help when a search term may refer to more than one thing, such as "Taj Mahal" (a landmark, a musician, and a casino). For search terms like this, Google will pick what it thinks is the best result, but will show alternative searches below the fact box.
"We’re proud of our first baby step—the Knowledge Graph—which will enable us to make search more intelligent, moving us closer to the 'Star Trek computer' that I've always dreamt of building," Amit Singhal, Google's senior vice president of engineering, in a blog post. (Interesting to note that Google has used the Star Trek analog to refer to a possible Siri competitor. Knowledge Graph could plant the roots for such a product.)
Knowledge Graph is arguably Google's biggest new search feature since Google Instant launched in 2010, not counting the Google+ integration that the company added earlier this year. For users sick of social search, the company's renewed focus on improving core search is a welcome change.

Friday, 4 May 2012

Surface Computing

Microsoft Surface Computer is the first in a new category of surface computing products from Microsoft that will ?break down traditional barriers between people and technology?. It is the next generation of computer interfaces those offer  multi-touch technology. Unlike most touchscreens, Surface computer can respond to more than one touch at a time. During a demonstration with a reporter, Mark Bolger, the Surface Computing group's marketing director, "dipped" his finger in an on-screen paint palette, then dragged it across the screen to draw a smiley face. Then he used all 10 fingers at once to give the face a full head of hair. So, forget the keyboard and mouse: The next generation of computer interfaces will be hands-on.
The "Surface" computer is a 30-inch table-top LCD that can be used by multiple people at the same time. Microsoft says, that the interactive display can recognize physical objects identification tags similar to bar codes, such as cellphones or chip-enhanced paintbrushes, but also enable users to engage in "hands-on" activities such as "digital finger painting" and interact with content through touch and "natural gestures".
A surface computer is able to recognize physical objects from a paintbrush to a cell phone and allows hands-on, direct control of content such as photos, music and maps. Surface turns an ordinary tabletop into a dynamic surface that provides interaction with all forms of digital content through natural gestures, touch and
physical objects.

The new product is aimed directly at hotels, retail establishments, restaurants and public entertainment venues and should be commercially available towards the end of the year. It?s an interesting product in that it?s completely out of left field. Microsoft gives examples of ordering a beverage during a meal with just the tap of a finger and quickly browsing through music and dragging favorite songs onto a personal playlist by moving a finger across the screen. Build this into a bar and you?d get one-touch beer service although I?m not sure if they?have found a way to work out when your beer glass is empty so replenishment becomes automatic, maybe in a later version. The practical uses for Surface at the point of sale are broad. This is touch screen point of sale technology at a new level.

Screen: A diff user turns the Surface's acrylic tabletop into a large horizontal "multi touch" screen, capable of processing multiple inputs from multiple users. The Surface can also recognize objects by their shapes or by reading coded "domino" tags.
Infrared: Surface's "machine vision" operates in the near-infrared spectrum, using an 850-nano meter-wavelength LED light source aimed at the screen. When objects touch the tabletop, the light reflects back and is picked up by multiple infrared cameras with a net resolution of 1280 x 960.
CPU: Surface uses many of the same components found in everyday desktop computers. A Core 2 Duo processor, 2GB of RAM and a 256MB graphics card. Wireless communication with devices on the surface is handled using WiFi and Bluetooth antennas (future versions may incorporate RFID or Near Field Communications). The underlying operating system is a modified version of Microsoft Vista.
Projector: Microsoft's Surface uses the same DLP light engine found in many rear-projection HDTVs. The footprint of the visible light screen, at 1024 x 768 pixels, is actually smaller than the invisible overlapping infrared projection to allow for better recognition at the edges of the screen.